

Note: This tutorial has been updated by Tony Dahbura. The original post was written by Gustavo Ambrozio.
Learn how to submit an app to Apple in this two-part series. This tutorial documents every step of becoming an Apple iOS developer – from literally no account, to published on the App Store!
You’ll see how to sign up for Apple’s iOS Developer Program, how to generate the various certificates needed, how to configure your app, and how to submit an app to the App Store for approval.
To create this tutorial, I created a completely new App Store account and submitted a new app to the App Store, keeping careful note of each step along the way.
In this tutorial you’ll submit an app called Drop Charge, which comes from 2D iOS & tvOS Games by Tutorials. The app has already been approved and can be downloaded for free from the App Store here.
For this tutorial showing you how to submit an app, you will need US$99 (or the equivalent fee applicable in your country), a valid credit card, and a browser. And it may go without saying, but to develop apps, you’ll need a Mac computer, with OS X installed.
Finally, you will need Xcode, Apple’s development software. You can download Xcode from the Mac App store now or wait until it’s covered in the tutorial.
It will help to approach this tutorial with some patience and perspective. Becoming a registered developer is a lengthy process and is sometimes repetitive. Just remember: in the end you will be able to submit an app (or apps!) to the App Store for potential fortune and glory!
Getting Started
The first step on the path to the App Store is to register as an Apple developer. Note that becoming an Apple developer is free, but this is not the same as being able to submit an app to the app store — to do that you must pay the aforementioned US$99 fee.
You may already have a developer account with Apple. If so, feel free to skip this section.
If you don’t yet have an Apple developer account, go to the Apple Developer Site and in the upper right click the Account link:

On the next page, you can choose to create a completely new Apple ID or use an existing one. If you want, you can save time and use the Apple ID you already use for your iTunes purchases, but it’s better to have a different ID to keep your personal and professional lives separate.
So, click Create Apple ID:

Fill in your email, password and security information. Use an email address that you check often, because Apple sends frequent updates on the program and on the status of apps you’ve submitted for approval.

Scroll down and complete the remaining security questions and a captcha prompt, then click Continue:

Check the email account you specified when registering. You should receive an email just like this:

The next page will prompt you to enter the code emailed to you, enter the code and click Verify:

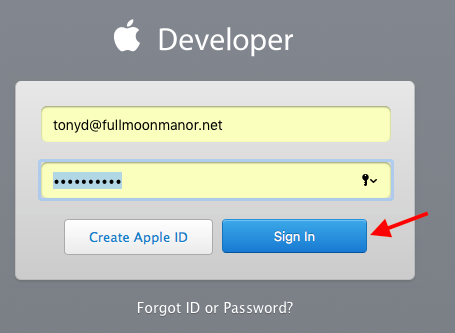
You now have a developer account Apple ID. Great work! :] Log in to the developer site using your new ID:

The next page is the “oh, so fun” legal agreement. Call your lawyer and read the whole thing to him/her on the phone. As soon as you get your lawyer’s approval, click the checkbox. You may want marketing emails too, so click that checkbox if you wish. Now click Submit:

Cool, you’re an Apple developer! That’s great, but can you start developing and submit an app to the App Store? Well, not quite… You have access to the libraries and tools, but you need to give Apple some money to submit an app to the app store.

Joining the Developer Program before you submit an app
Being a registered Apple developer gives you access to a lot of information, but to be able to send apps to the App Store (and to have access to certain associated portals) you need to enroll in Apple’s Developer Program. In the past, there was the iOS program, OSX program, and Safari program. Now there is one program and the same fee covers all platforms. This is the part that will cost you US$99 per year.
If you followed along with the previous section and clicked Continue, you should be in the right place. If you skipped the previous section because you already have an Apple developer account, then go to the Developer Member Center, log in, and you’ll be in sync.
Once logged in, click the Join the Apple Developer Program link on the lower center of the page:

Now click Enroll:

This next page describes enrollment as an Individual or as a Company. For this tutorial, you’ll see how to enroll as an individual. If you choose to enroll as a company the process won’t be as easy — you will need to submit a lot more paperwork to prove your involvement in the company.
Take a deep breath, make sure you have half an hour to spend, and click Start Your Enrolment:

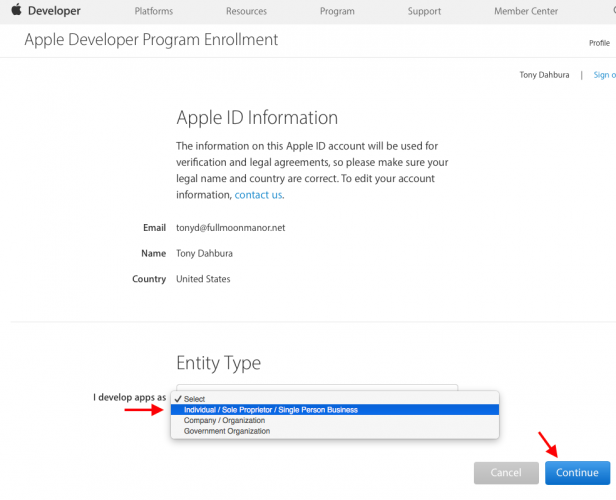
The next page asks if you want to enroll as an individual, as a company, or as a government organization. If you do choose to enroll as a company, read the requirements on the right to make sure you have everything you’ll need.
Select Individual / Sole Proprietor / Single Person Business, and click Continue:
Enter your billing/business information to verify your identity. Apple will attempt to confirm this information with your credit card company, so make sure you enter it correctly:

Fill in the remaining fields and at the bottom you’ll see yet another “oh so fun” license agreement. So call your lawyer again, get the OK to check the box and click Continue:

Review your information and when you’re ready to submit, click Continue:

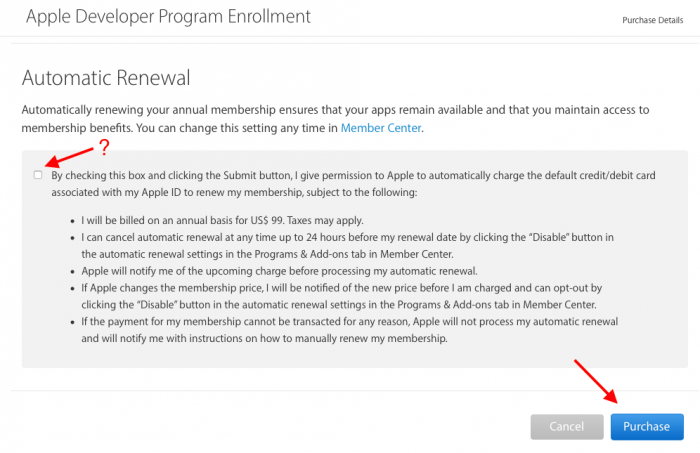
You will now be prompted with the cost and and a summary for the purchase. You have the option for automatic renewal every year, which saves having to remember to renew, preventing any chance that your apps become unavailable if you’re on holiday!
Check Automatic Renewal if you want this option, then click Purchase:
You’ll now have to log in yet again. Use your newly created Apple ID.

Note: The following steps only apply to the US and other countries with online Apple Stores. For countries without online Apple Stores, the process will be slightly different, requiring you to fax your credit card information to Apple. Unfortunately, if you’re in one of those countries, you’ll be on your own for the remainder of this section. So, follow Apple’s instructions and skip to the next section.
For everyone still following along, fill out the payment screen (the values below are fake — use the right values for yourself), again verify your billing information for the purchase:

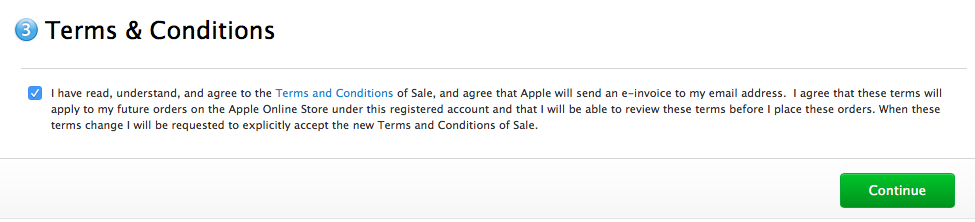
Once again, you will be asked to agree to the Terms & Conditions. Call your lawyer again to get the important go-ahead, tick the box and then click Continue:
Confirm your intent to purchase the membership:

Shortly afterwards you will be greeted by a thank you screen:

You’re welcome!
Now, Let Me In!
After submitting and paying for your iOS Developer registration, you’ll need to wait a short while for Apple to process your order.
If you had to fax your information to Apple because you’re in a country without an online Apple Store, you’ll need a little more patience.
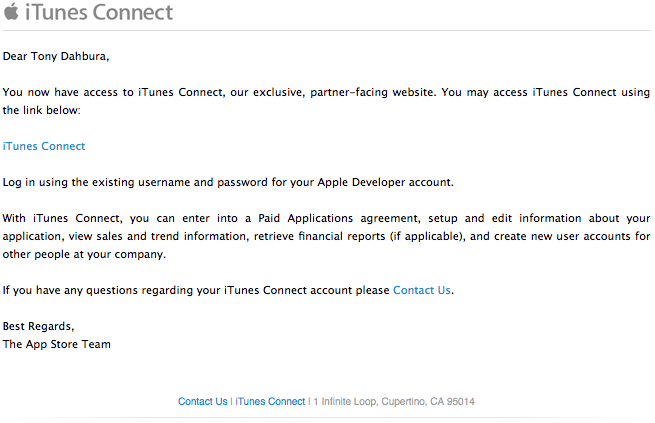
In either case, eventually you should get an email from Apple like this one:

At the same time, you should receive this email:
At this point you should download Xcode by proceeding to the Apple App Store using the App Store icon on your application dock. Apple places the latest non-beta release in the App Store. Search for Xcode or click here. While you will only be using Xcode very briefly in this tutorial, there are many other excellent tutorials on RayWenderlich.com to teach you how to use it!
Now go to the Developer Center and sign in:
After providing your credentials, you’ll be in! Finally!

The Developer Center has a LOT of information. There are programming guides, downloadable code, documentation, videos, the very helpful developer forum and a support center.
Spend some time exploring to familiarize yourself with what’s available. Be aware that some of this information might be confidential, especially if it involves beta versions of any SDKs or Tools.
In this tutorial that demonstrates how to submit an app, you’re going to focus on two areas that you’ll use a lot when developing your apps: the Certificates, IDs & Profiles area and iTunes Connect:

But first, a brief introduction to each is in order.
Certificates, IDs & Profiles
As you may already know, a non-jailbroken iOS device is only able to run apps approved by Apple and installed through the App Store.
Apple achieves this by requiring that every app run by iOS has a signed Apple Certificate. Apps installed from the App Store come bundled with a certificate, which the system verifies before it allows the app to run. If there’s no signature or if the signature is invalid, the app won’t run.
As a developer, you need to be able to run your apps on your own devices on a regular basis as you’re developing them. For this you need a way to create and sign your own certificates.
That’s where the Certificates, IDs & Profiles area comes in. This section allows you to generate what Apple calls “profiles”. Profiles, sometimes called “code signing identities”, are files generated by the Developer Center that allow Xcode to sign your apps in a way that allows iOS on your devices to identify as valid.
There are two types of profiles:
- Development profiles. These are tied to specific devices, so the app can only run on those.
- Distribution profiles. These are used to sign your app before you submit it to Apple for approval. They contain no device-specific information, but you can’t use them to install apps on any device yourself, because Apple still has to sign the app after the approval process.
The Certificates, IDs & Profiles area can also generate push certificates in case your app wants to send push notifications.
iTunes Connect
iTunes Connect is the portal you’ll use to submit an app. This is where you’ll register a new app, enter the app’s description and screenshots, choose the price, and configure game center and in-app purchases.
This is also the portal you’ll use to agree to new contracts, set your financial data (so you can bank that profit) and check your sales.
You’ll spend the rest of this tutorial working in the Certificates, IDs & Profiles area. Next time, in Part Two, you’ll look at iTunes Connect.
Certificates, IDs and Profiles
In this next part of the tutorial, you’re going to use the Certificates, IDs and Profiles area to set up the information you need in order to deploy your app to your device (and later the App Store).
Note that there is a simpler way to do this in Xcode called Automatic Device Provisioning, that you will cover in part two of the series. But for now, you’re going to go through the process step-by-step. You’ll understand how things work better this way, and it’s very useful to know when submitting to the App Store.
If you still have your Developer Center page in front of you (if not log in again), just click the Certificates, IDs & Profiles link on the left side or click on the gear icon in the middle of the page:

There are a lot of things you’ll need to do from this area. Some of them you’ll only have to do once, like generating your certificates and registering your devices. Other things you’ll have to repeat for every app you make, like generating development and distribution profiles.
Generating Certificates
First you’ll need to generate two certificates, one for your development profiles and another for your distribution profiles. As the text on the page explains, you can request a certificate via Xcode, or manually. But it’s really useful for you to understand the manual process so you’ll be uploading a Certificate Signing Request (or CSR) from your Mac.
Make sure the drop down in the upper left says iOS, tvOS, watchOS, then click on the + in the upper right:

On the next page, select iOS App Development as the certificate type and click Continue at the bottom:


An explanation of how to generate a CSR using Keychain Access is then shown. To follow the instructions, you need to open the Keychain Access app on your Mac. If you don’t know where it is, search for it using Spotlight:

Once the program is open, choose Keychain Access\Certificate Assistant\Request a Certificate From a Certificate Authority…:

In the Certificate Assistant window, fill in your email address and name, choose Save to disk and click Continue:

Save the file somewhere on your Mac. That’s your CSR created, now to generate that certificate.
Go back to the Developer Centre in your browser — you should now click Continue

Click Choose File…, locate the CSR file you just created and select it, then click Continue

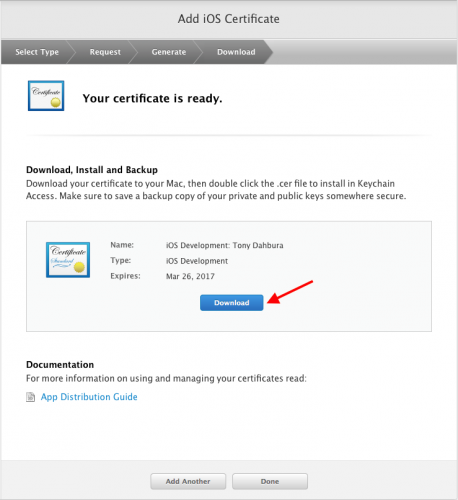
You will now see a screen that says your certificate is ready. Click Download, and double click the development certificate file to install it in the keychain:
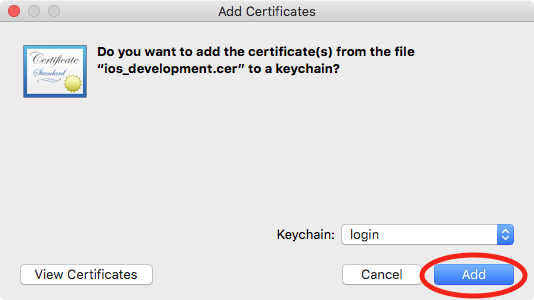
Click Add in in the Keychain Access dialog to complete the installation:
Now you have your certificate for your development profiles, you need to create a certificate for your production or distribution profiles. Click the Add Another button. Under Production select the App Store and Ad Hoc button, and click Continue at the bottom as before:

Go through the same process as before to submit the same certificate signing request as you did for the development certificate.
When it is ready, click Download, and double click the distribution certificate file to install it in the keychain:

Note: The distribution certificate is called ios_distribution.cer, whereas the development certificate you downloaded before is called ios_development.cer.
Note: You may have seen some text at the bottom of the screens before you clicked “Continue” talking about Intermediate Certificates. When you launch Xcode, or if you have already launched Xcode, it will install these automatically for you. Should you ever need to install them for some reason in the future just can click the + as if creating a new certificate and scroll down to the link to download the file:

This will download a file called AppleWWDRCA.cer. Double-click this file to install it. It will open Keychain Access again in case you closed it.
Now look in Keychain Access and you will see your two installed certificates as follows:

Note: If you do not see the message This certificate is valid with a green check-mark, then you have either not launched Xcode yet, or you need to install the Intermediate Certificates, as noted above. The easiest step is to launch Xcode and let it update the intermediate certificate for you.
Now you can close Keychain Access.
Registering Devices
Let’s continue. The next step is to register your devices. On the left-side menu, click Devices\All and then on the right, +:

You need to get the UDID of the device(s) you want to use to run your apps. There are many ways to get a device’s UDID: there are free apps available that will do it for you, or you can use Xcode’s organizer. Here, you’ll get a UDID using iTunes.
Open iTunes and plug the device into your computer. Select the device from the menu bar under the player controls. iTunes will display your device name, capacity, version, serial number and phone number. Click on the serial number and it will change to your device’s UDID:

Now just right click on the number and select Copy to copy the UDID to your clipboard.
Go back to your browser, enter a device name (which can be anything you want) and paste the UDIDinto the appropriate field. When you’re done, click Continue

You will now be prompted to confirm the registration. Click Register:

Your device is now registered, and will appear in your list of devices:

You can always go back later to register more devices, such a those belonging to friends and beta-testers.
Note: Apple allows you to register up to 100 devices per year to your account. If you register a device and later remove it, it still counts towards your total for the year.
Creating App IDs
Now that your device is registered, you need to create an App ID. Every app you build will need its own App ID. On the side menu, click Identifiers\App IDs:

You’ll see a brief explanation of the App ID concept. In a nutshell, an App ID is a combination of a 10-character “seed” prefix generated by Apple, and a suffix created by you, defined as a Bundle ID search string. Together they create a unique identifier for your app.
Here are some important things to know about App IDs:
- You can elect to have all of your apps share the same seed prefix, if you want to share keychain information between them. Say you have a suite of apps that all make use of the same website via a login. If the apps share the same seed prefix, and one app saves the user’s login information to the iOS keychain, any other app in the suite can get this login information from the keychain.
- You can create two different types of App ID: an Explicit App ID, or a Wildcard App ID. Explicit App IDs must be used when you wish to incorporate services such as in-app purchases or iCloud. Wildcard App IDs should be used when you want to use the same App ID for multiple apps.
- In an Explicit App ID, the Bundle ID search string has to be unique for each of your apps. It will be used by Apple’s push notifications service, for in-app purchases and for other services such as iCloud storage.
- Apple recommends that you use “a reverse-domain name style string” for the Bundle ID. For an Explicit App ID, the suggested format is “com.domainname.appname”; for a Wildcard App ID, the suggested format is “com.domainname.*”.
- Remember, if you use a Wildcard App ID, you won’t be able to use any of the neat services normally available, such as push notifications or in-app purchases. You might not plan to use these services now, but if you change your mind, you won’t be able to change your App ID without creating a new app.
Now that you know all about App IDs, it’s time to create one. On the right side of the screen click +:

Fill out the description (usually just your app’s name). The seed ID will usually always be your Team ID. Now, make sure Explicit app ID is selected, and enter the Bundle ID – remembering to use a reverse-domain name style string for this, including the name of the app at the end. Click Continue when done:

You will be prompted to confirm your values, click Register at the bottom. You will then see a Registration Complete message:

Now you’re ready to create the provisioning and distribution profiles.
Provisioning Profiles
On the side menu, click Provisioning Profiles\All:

You’ll see a brief explanation describing getting started with iOS provisioning profiles. A provisioning profile joins together all the pieces you have done so far, including certificates, device identifiers, and the App ID.
Development provisioning profiles are used to build and install versions of your app during your development process and Distribution provisioning profiles are used for submitting your apps to the App Store and beta testers.
On the right side of the screen click on the +:

Choose iOS App Development, then click Continue:

The next screen asks you to select an App ID for this new profile. Since you’ve only generated one so far, the drop down menu contains just this one. Click Continue:

The following screen asks you to select the certificates for the profile. If you have multiple members on a team they can be selected from here. Select your certificate checkbox and click Continue:

This screen asks for the devices this profile is valid for, select your device and click Continue:

Now, enter a name for this profile. The name you specify is used to identify it among other profiles, so try to make it as descriptive as possible. Click Continue:

The final page shows your generated profile and has a download button that allows you to download it. Go ahead and click Download:

Since you are already here, go ahead and generate the distribution profile. You won’t actually need this profile until you’re ready to submit the app for approval, but since you’re here, it’s worth doing it now. Click the Add Another button at the bottom:

Under Distribution, click the App Store button, then click Continue:

The next few steps are the same as for the development profile. Follow the screens along, name the distribution profile something descriptive and unique and download it as you did the development profile.
Now find the files you just downloaded on your computer, and double-click each of them in turn causing Xcode to launch. Verify the profiles are there by opening a project or starting a new one for this test. Click on the Project in the left pane. Select Build Settings, select All, scroll down to Code Signing and click on the word Automatic next to the entry for Provisioning Profile. Your profiles should be listed:
I am in fact thankful to the holder of this web
site who has shared this fantastic paragraph at at this time.
Thanks. a very useful article; could not make it without
ya!
Thank you !
Heya i am for the primary time here. I found this board and I
find It really useful & it helped me out a lot. I hope to give one
thing back and aid others like you helped me.
What’s up, just wanted to say, I loved this blog post.
It was helpful. Keep on posting!
Many thanks very useful. Will share website with my buddies.
Way cool! Some very valid points! I appreciate you writing this article and the rest of the website is extremely good.