Tản mạn cuộc sống

Tản mạn cuộc sống

Trải nghiệm và đúc kết của riêng mình thôi nhé, có thể với nhiều người sẽ rất khác vì không phải ai cũng giống ai nên mình chỉ chia sẻ các vấn đề chung chung

– Thời gian không bao giờ quay lại và tuổi trẻ chỉ có 1 thời oanh liệt, bạn có thể trở thành một người thành đạt, một thằng nghiện hay 1 con phò… Điều đó không quan trọng, xã hội muôn hình muôn vẻ và bạn có quyền trở thành bất cứ thứ gì, miễn là bạn thực sự thích.

– Không bao giờ tranh luận những thứ vô bổ, nhất là với những người bạn của mình vì dù bạn thắng hay thua cũng đều khiến tình bạn rạn nứt. Nếu ở gần những người như vậy tốt nhất nên tránh vì hàng ngày bạn đã có quá đủ bực mình trong công việc hoặc gia đình. Bạn bè dù giàu hay nghèo, trình độ học vấn hay nghề nghiệp thế nào ko quan trọng, miễn là thấy thoải mái khi ngồi với nhau. Bạn là bạn, không phải đồng nghiệp hay đối tác nên nếu quan hệ bạn bè dựa trên tiền bạc hay lợi ích nó sẽ không thể bền. Cùng đừng bao giờ tỏ ra giỏi hơn, giàu hơn bạn mình vì vị thế của bạn bè và mình là ngang nhau.

– Một ngày có 24 tiếng, 8 tiếng làm việc, 8 tiếng nghỉ ngơi và 8 tiếng còn lại hãy dành cho bản thân, gia đình, bạn bè để cảm nhận những giá trị thực sự của cuộc sống. Đừng phá vỡ tỉ lệ cân bằng này.

– Dù bạn có thông minh tài giỏi đến đâu đi chăng nữa thì khi kinh doanh bạn bắt buộc phải có 1 số vốn. Nếu không tất cả vẫn chỉ nằm trong đầu bạn là những ý tưởng không thể thực hiện. Thời gian, vòng quay cuộc sống sẽ dần giết chết nó.

– Chọn một công việc thú vị, tạo cho mình hứng khởi đi làm mỗi ngày thứ 2.
Nếu vì an phận hoặc do sắp đặt mà bạn chấp nhận một công việc nhàm chán, lặp đi lặp lại thì coi như bạn đã chết ở tuổi 25 vì cuộc sống của bạn sẽ xoay quanh nó và mọi sự trải nghiệm, khám phá, hưởng thụ cuộc sống tươi đẹp này đã dừng lại ngay từ lúc đó.

– Không nên tập trung phần lớn thời gian, tiền bạc của mình cho 1 hay 2 sở thích đơn thuần mà hãy chia nhỏ nó ra. Thay vì dùng hết 1 ngày lương của mình ( khoảng 500k) để đánh tất tay 1 con lô thì bạn có thể dùng 20k cafe, 30k mua gói thuốc lá, 100k để cải thiện bữa chiều cho gia đình, 80k để mua vé xem phim, 120k mua đôi quần sịp mới và dùng 50k còn lại đánh văn nghệ 2 điểm lô. Dù được hay mất chắc chắn bạn sẽ có 1 ngày cuối tuần vui vẻ.

– Cứ 5 năm bạn sẽ mất đi 1 nửa số bạn của mình. Đây là sự chọn lọc tự nhiên rất bình thường. Nếu 1 ngày bạn chợt nhận ra thằng bạn mà mình chơi cùng bấy lâu gây rất nhiều phiền phức cho cuộc sống của mình hay cảm thấy không thoải mái, thậm chí bực mình mỗi khi gặp nó thì nên tìm cho mình 1 người bạn khác thay vì níu kéo hay tiếp chơi với nhau theo kiểu bằng mặt không bằng lòng. Nếu bạn sống tốt thì chảng bao giờ sợ không có bạn để chơi vì ai cũng muốn có những người bạn như vậy.

– Khi giúp đỡ người khác bạn sẽ không bao giờ thiệt. Có thể người được bạn giúp sẽ không bao giờ giúp lại được bạn nhưng sẽ có người khác thay họ làm điều đấy với bạn. Lòng tốt và sự nhiệt tình luôn được đánh giá cao và những người có khả năng sẽ đánh giá điều này ở bạn và giúp đỡ khi bạn cần. Chẳng ai thừa tiền hay thời gian đi giúp 1 kẻ chẳng ra gì trừ khi đó là bố, mẹ, anh chị người đó. Mọi việc đều có nhân quả, mặc dù chỉ tồn tại ở mức tương đối nhưng hãy tin rằng mọi hành động của bạn đều phải trả giá, tốt hay xấu là do bạn.

– Dù bạn là ai, đang giàu có hay khó khăn thì cùng đùng ngại đối mặt. Nếu bạn nghèo mà cố gắng mãi cũng không ngóc đầu lên được thì cũng đừng buồn mà hãy nghĩ đơn giản rằng: oh, đây là những trải nghiệm mà những kẻ giàu có không bao giờ có được.

– Tìm hiểu và học hỏi kiến thức không bao giờ là thừa dù nó có áp dụng cho công việc của bạn hay không. Mình quen 1 ông anh qua 1 người bạn và ông này cũng rất thích nói chuyện về phim ảnh, lịch sử như mình nên đã gián tiếp dùng sự ảnh hưởng của anh này giúp mình rất nhiều trong công việc cũng như cuộc sống.

Bean Rescue – Giải cứu đậu nhỏ

Bean Rescue – Giải cứu đậu nhỏ

Developer : JumpAlpha Team

Avaiable on

GooglePlay : Bean Rescue

AppStoreBean Rescue on AppStore

Bean was lost in the mysterious land with the jungle swamp, a volcanic crater, and a rugged waterfall. He is trying to come back home but there are lots of challenges and difficulties waiting for him

HOW TO PLAY :

– Bean can only jump forward, jump to the left or right footholds but he can’t hop backwards or diagonally. And he can jump out to every foodhold once.

How can he overcome this jump adventure? He needs your help!

Tâm Đức

Thế gian có đủ loại người
Có trăm ngàn chuyện nực cười mà đau
Giỗ cha thì tị nạnh nhau
Ra ngoài nhậu nhẹt dành nhau trả tiền

Đói cơm thì nhớ mẹ hiền
Đến khi giàu có nhiều tiền lại quên
Ra ngoài vâng dạ cấp trên
Về nhà mặt cứ kên kên lầm lì

Gặp cướp tay vái chân quỳ
Về nhà cha nói tức thì cãi ngang
Ra ngoài nịnh kẻ giàu sang
Về nhà khinh bỉ xóm làng bà con

Gặp bạn hải sản bia lon
Về nhà tính toán vợ con từng hào
Đến chùa từ thiện ào ào
Gửi tiền thăm mẹ tính vào tính ra

Ra đường gặp gái hát ca
Về nhà thấy vợ hét la ầm ầm
Của mình quý giá hơn sâm
Của người rẻ mạt ngang tầm rác rơm

Muốn đời ăn ngọt mặc thơm
Lại luôn dành lấy phần hơn về mình
Sống không nghĩ đến chữ tình
Chỉ biết hãm lợi riêng mình mà thôi

Làm người đừng thế ai ơi !
Giàu sang nghèo khổ cũng rời trần gian
Tiền của chết chẳng ai mang
Tâm Đức để lại vẻ vang bao

20 câu lệnh SSH hay sử dụng nhất

20 câu lệnh SSH hay sử dụng nhất

20 câu lệnh SSH bên dưới là những lệnh thông dụng nhất bất kỳ ai cũng phải biết để có thể thao tác, quản trị VPS Linux.

Lưu ý:

  • Thư mục, đường dẫn đến thư mục thường kết thúc bởi ký tự /
  • File, đường dẫn đến file không có ký tự / ở cuối
  • Một file trên Linux không phải lúc nào cũng có đuôi đằng sau

20 câu lệnh SSH thông dụng nhất

1. Di chuyển giữa các thư mục

cd [another directory]

VD: chuyển đến thư mục chứa file cấu hình Nginx

cd /etc/nginx/conf.d/

2. Chuyển đến thư mục home của user

cd ~

Nếu bạn login bằng tài khoản root thì lúc này thư mục home sẽ là /root

3. Chuyển đến thư mục trước đây

cd -

4. Di chuyển đến thư mục cha

cd ..

5. Hiển thị đường dẫn thư mục hiện tại

pwd

6. Hiển thị tất cả file/thư mục ở thư mục hiện tại

ls

7. Hiển thị tất cả file và thông tin

ls -al

8. Hiển thị tất cả file với đuôi bất kỳ

ls *.ext

VD: hiển thị toàn bộ file *.PHP

ls *.php

9. Hiển thị tất cả file/thư mục với thông tin chi tiết

ls -alh

10. Tắt kết nối SSH

exit

Quản lý File

11. Copy và đổi tên file

File cũ vẫn được giữ nguyên.

cp [filename] [new filename]

VD: copy và đổi tên file banner.jpg thành banner728px.jpg

cp banner.jpg banner728px.jpg

VD: copy banner.jpg vào folder ads và đổi tên thành banner728px.jpg

cp banner.jpg ads/banner728px.jpg

12. Move và đổi tên file

File cũ sẽ bị xóa và chuyển sang thư mục mới.

mv [old filename] [new filename]

VD: di chuyển banner.jpg sang folder ads

mv banner.jpg ads/banner.jpg

VD: di chuyển banner.jpg sang folder ads và đổi tên file thành banner728px.jpg

mv banner.jpg ads/banner728px.jpg

Tương tự, bạn có thể di chuyển cả folder.

VD: chuyển folder image vào folder media

mv image/ media

VD: chuyển folder image ra thư mục cha

mv image/ ..

13. Xóa một file

rm [file name]

VD: xóa file banner.jpg

rm banner.jpg

14. Xóa toàn bộ file ở thư mục hiện tại

rm *

15. Xóa toàn bộ file với extension bất kỳ

rm *.ext

VD: xóa toàn bộ file .jpg

rm *.jpg

16. Copy một folder kèm theo toàn bộ files, thư mục bên trong

cp -r [directory] [new directory]

17. Tạo thư mục mới

mkdir [folder name]

VD:

mkdir image

18. Tìm kiếm một file từ thư mục hiện tại

find . -name [filename] -print

VD: tìm file banner.jpg ở thư mục hiện tại

find . -name banner.jpg -print

19. Tìm kiếm nội dung trong một file

grep [text] [filename]

VD: tìm từ sidebar trong file index.php

grep sidebar index.php

20. CHMOD – thay đổi file permission

chmod [permission type] [file/folder name]

VD:

chmod 777 wp-config.php

Cách đặt permission:

Số đầu tiên cho file owner, số thứ 2 cho group của owner, và số thứ 3 cho toàn bộ user và group khác.
7 = Read + Write + Execute
6 = Read + Write
5 = Read + Execute
4 = Read
3 = Write + Execute
2 = Write
1 = Execute
0 = All access denied
Privacy Policy

Privacy Policy

JumpAlpha built the Application as a Free app. This SERVICE is provided by JumpAlpha at no cost and is intended for use as is.

This page is used to inform visitors regarding my policies with the collection, use, and disclosure of Personal Information if anyone decided to use my Service.

If you choose to use my Service, then you agree to the collection and use of information in relation to this policy. The Personal Information that I collect is used for providing and improving the Service. I will not use or share your information with anyone except as described in this Privacy Policy.

The terms used in this Privacy Policy have the same meanings as in our Terms and Conditions, which is accessible at Application unless otherwise defined in this Privacy Policy.

Information Collection and Use

For a better experience, while using our Service, I may require you to provide us with certain personally identifiable information. The information that I request will be retained on your device and is not collected by me in any way.

The app does use third party services that may collect information used to identify you.

Link to privacy policy of third party service providers used by the app

Google Play Services
AdMob

Log Data

I want to inform you that whenever you use my Service, in a case of an error in the app I collect data and information (through third party products) on your phone called Log Data. This Log Data may include information such as your device Internet Protocol (“IP”) address, device name, operating system version, the configuration of the app when utilizing my Service, the time and date of your use of the Service, and other statistics.

Cookies

Cookies are files with a small amount of data that are commonly used as anonymous unique identifiers. These are sent to your browser from the websites that you visit and are stored on your device’s internal memory.

This Service does not use these “cookies” explicitly. However, the app may use third party code and libraries that use “cookies” to collect information and improve their services. You have the option to either accept or refuse these cookies and know when a cookie is being sent to your device. If you choose to refuse our cookies, you may not be able to use some portions of this Service.

Service Providers

I may employ third-party companies and individuals due to the following reasons:

To facilitate our Service;
To provide the Service on our behalf;
To perform Service-related services; or
To assist us in analyzing how our Service is used.
I want to inform users of this Service that these third parties have access to your Personal Information. The reason is to perform the tasks assigned to them on our behalf. However, they are obligated not to disclose or use the information for any other purpose.

Security

I value your trust in providing us your Personal Information, thus we are striving to use commercially acceptable means of protecting it. But remember that no method of transmission over the internet, or method of electronic storage is 100% secure and reliable, and I cannot guarantee its absolute security.

Links to Other Sites

This Service may contain links to other sites. If you click on a third-party link, you will be directed to that site. Note that these external sites are not operated by me. Therefore, I strongly advise you to review the Privacy Policy of these websites. I have no control over and assume no responsibility for the content, privacy policies, or practices of any third-party sites or services.

Children’s Privacy

These Services do not address anyone under the age of 13. I do not knowingly collect personally identifiable information from children under 13. In the case I discover that a child under 13 has provided me with personal information, I immediately delete this from our servers. If you are a parent or guardian and you are aware that your child has provided us with personal information, please contact me so that I will be able to do necessary actions.

Changes to This Privacy Policy

I may update our Privacy Policy from time to time. Thus, you are advised to review this page periodically for any changes. I will notify you of any changes by posting the new Privacy Policy on this page. These changes are effective immediately after they are posted on this page.

Contact Us

If you have any questions or suggestions about my Privacy Policy, do not hesitate to contact us.

khai@jumpalpha.info . We will make every effort to resolve your concerns

Effective Date: Sep 19, 2018

Facebook privacy policy

Facebook privacy policy

Application Privacy Statement

—–

This privacy statement (“Privacy Statement”) applies to the treatment of personally identifiable information submitted by, or otherwise obtained from, you in connection with the associated application (“Application”). The Application is provided by JumpAlpha (and may be provided by JumpAlpha on behalf of a JumpAlpha licensor or partner (“Application Partner”). By using or otherwise accessing the Application, you acknowledge that you accept the practices and policies outlined in this Privacy Statement.

WHAT PERSONAL INFORMATION DOES JUMPALPHA COLLECT?

We collect the following types of information from our users:

Personal Information You Provide to Us:

We may receive and store any information you submit to the Application (or otherwise authorize us to obtain – such as, from (for example) your Facebook account). The types of personal information collected may include your full name, email address, gender, IP address, browser information, username, demographic information, and any other information necessary for us to provide the Application services.

Personal Information Collected Automatically:

We receive and store certain types of usage related information whenever you interact with Application. For example, JumpAlpha may automatically receive and record information regarding your computer’s IP address, browser information, Facebook user ID, Facebook Page fan status, and URLs accessed. Such information may be shared in aggregate (non-personally identifiable) form with our partners.

HOW DOES JUMPALPHA USE THE INFORMATION IT COLLECTS?

JumpAlpha uses the information described in this Privacy Statement (i) internally, to analyze, develop and improve its products and services, and (ii) as set forth below in the “Will JumpAlpha Share any of the personal information it Collects” section below.

APPLICATION PARTNER TREATMENT OF PERSONAL INFORMATION.

JumpAlpha may provide personal information to the applicable Application Partner. The Application Partner’s use of your personal information is subject to the Application Partner’s separate privacy policy – and not this Privacy Statement. The Application Partner’s privacy policy is linked to from within the Partner’s Facebook application.

WILL JUMPALPHA SHARE ANY OF THE PERSONAL INFORMATION IT RECEIVES?

Personal information about our users is an integral part of our business. We neither rent nor sell your personal information to anyone (with the exception of sharing your information with an applicable Application Partner – see the “Application Partner Treatment” section above). We share your personal information only as described below.

Application Partners: We will share your personal information with an applicable Application Partner (see the “Application Partner Treatment” section above).

Agents: We employ other companies and people to perform tasks on our behalf and need to share your information with them to provide products or services to you. Unless we tell you differently, JumpAlpha’s agents do not have any right to use personal information we share with them beyond what is necessary to assist us. You hereby consent to our sharing of personal information for the above purposes. Business Transfers: In some cases, we may choose to buy or sell assets. In these types of transactions, customer information is typically one of the business assets that are transferred. Moreover, if JumpAlpha, or substantially all of its assets were acquired, or in the unlikely event that JumpAlpha goes out of business or enters bankruptcy, user information would be one of the assets that is transferred or acquired by a third party. You acknowledge that such transfers may occur, and that any acquirer of JumpAlpha may continue to use your personal information as set forth in this policy.

Protection of JumpAlpha and Others: We may release personal information when we believe in good faith that release is necessary to comply with the law; enforce or apply our conditions of use and other agreements; or protect the rights, property, or safety of JumpAlpha, our employees, our users, or others. This includes exchanging information with other companies and organizations for fraud protection and credit risk reduction.

With Your Consent: Except as set forth above, you will be notified when your personal information may be shared with third parties, and will be able to prevent the sharing of this information.

CONDITIONS OF USE.

If you decide to use or otherwise access the Application, your use/access and any possible dispute over privacy is subject to this Privacy Statement and our Terms of Use, including limitations on damages, arbitration of disputes, and application of California state law.

THIRD PARTY APPLICATIONS/WEBSITES.

The Application may permit you to link to other applications or websites. Such third party applications/websites are not under JumpAlpha’s control, and such links do not constitute an endorsement by JumpAlpha of those other applications/websites or the services offered through them. The privacy and security practices of such third party application/websites linked to the Application are not covered by this Privacy Statement, and JumpAlpha is not responsible for the privacy or security practices or the content of such websites.

WHAT PERSONAL INFORMATION CAN I ACCESS?

JumpAlpha allows you to access the following information about you for the purpose of viewing, and in certain situations, updating that information. This list may change in the event the Application changes.

– Account and user profile information
– User e-mail address, if applicable
– Facebook profile information, if applicable
– User preferences
– Application specific data

CAN CHILDREN USE THE APPLICATION?

Our site and the services available through JumpAlpha are not intended for children under the age of 13. JumpAlpha does not knowingly or specifically collect information about children under the age of 13 and believes that children of any age should get their parents’ consent before giving out any personal information. We encourage you to participate in your child’s web experience.

CHANGES TO THIS PRIVACY STATEMENT.

JumpAlpha may amend this Privacy Statement from time to time. Use of information we collect now is subject to the Privacy Statement in effect at the time such information is used. If we make changes in the way we use personal information, we will notify you by posting an announcement on our Site or sending you an email. Users are bound by any changes to the Privacy Statement when he or she uses or otherwise accesses the Application after such changes have been first posted.

QUESTIONS OR CONCERNS.

If you have any questions or concerns regarding privacy on our Website, please send us a detailed message at contact@jumpalpha.info. We will make every effort to resolve your concerns.

Effective Date: July 13, 2018

privacy_policy_ABC

privacy_policy_ABC

Revised: May , 2023


KIDS GAMES PRIVACY POLICY

Your privacy is important to JumpAlpha and we are committed to protecting the privacy of parents and kids. Please take a moment to familiarize yourself with our privacy practices.

JumpAlpha uses and makes all attempts to protect all information when you use our apps & services.

If you do not agree to this Privacy Policy, please do not use the service. We reserve the right to make changes to this Privacy Policy. If we make a material change to this Privacy Policy, we will notify you by posting the change in this Privacy Policy. Please check back from time to time to ensure that you are aware of these changes. Your continued use of the Service will signify your acceptance of these changes.

Personal Data Collected:

We use technologies like cookies on our website (small files stored by your browser or operating system), web beacons, or unique device identifiers to anonymously identify your computer or device. Our systems also logs information like your browser, operating system, IP address and anonymous usage data so we can deliver a better experience. We do not sell, trade, or rent Users personal identification information to others.

Non-personal Data:

For purposes of this Privacy Policy, “non-personal data” means information that does not directly identify you. Additionally, non-personal data means “aggregate” and “de-personalized” information, which is data JumpAlpha collects about the use of JumpAlpha users, from which any personally identifiable data has been removed.

App Store and Data Collection:

Our free apps show third party advertisements in applications. Please refer to our privacy policy of our Ads partner

AdMob

We make the toddler focused games available via app stores such as Apple’s App Store, Google Play, Amazon AppStore, and Windows Store’s. While using the game, the App Store may use cookies, unique device identifier codes, software and hardware information, browser information, time zone and usage information or other technology to collect and process the information about you, and we may have access to it. We have no control over an App Store’s collection or use of information and cannot change what information is made available to us by the App Store.

If you do not want to be subject to these technologies, do not use or access our Services.

Information Disclosure & Security:

In the following circumstances, we may disclose your personal information according to your wish or regulations by law:

  • Your prior permission.
  • By the applicable law within or outside your country of residence, legal process, litigation requests.
  • By requests from public and governmental authorities.
  • To protect our legal rights and interests. We take reasonable steps to secure your information against unauthorized access or disclosure. We encrypt transmission of data on pages where you provide payment information. However, no security or encryption method can be guaranteed to protect information from hackers or human error.

Contacting Us:

If you have any questions regarding the Privacy Policy, please contact us at the following email address.
hoangtumituotlove730@gmail.com


How to Submit An App to Apple: From No Account to App Store – Part 2

How to Submit An App to Apple: From No Account to App Store – Part 2

Note: This tutorial has been updated by Tony Dahbura. The original post was written by Gustavo Ambrozio.

So you’re on your way to being a big iOS developer, eh? You’ve paid your US$99 fee, and had your great app idea. Maybe you even put it all together and got it running in Xcode.

What, you haven’t finished coding your app since reading How to Submit An App to Apple, Part One? No matter. There are other tutorials that cover that.

This is the tutorial series explaining the basics of how to register as an iOS Developer, and how to interface with Apple’s portals to test and then submit an app for approval.

In Part One, you went through the developer registration process, and you used the iOS Developer Center to register your devices and to create the certificates and profiles Apple requires to test and submit an app.

Now in Part Two, you’ll configure an app to run on the devices you registered, use iTunes Connect to send Apple all the information they need to pay you for your apps, and finally, you’ll submit an app to Apple for approval.

Ready to jump from beginning developer to approved seller? (At least virtually.) Then read on!

Getting Started

OK, that section header is a fake-out. Before we actually get started, there’s an easier way to get your apps running on your devices, rather than setting up the provisioning profiles manually like you did in part 1.

The truth is, in some situations, such as when working with more than one developer account, the automatic provisioning you’re about to see just doesn’t work. But here’s how to do it to save yourself time, when you can.

Open Xcode if you haven’t already. Note that for this tutorial, the screenshots and instructions are applicable for version 7.3 (but it should work for future Xcode versions as well).

Once in Xcode, open the Devices window (⇧⌘2), plug in your iOS device and select it from the menu on the left. If this is the first time you’ve connected your device whilst Xcode is running, Xcode may take some time to sort itself out — and you’ll see a message saying that it’s “processing symbol files”. Eventually, this will be complete and your screen should look something like below:

submit an app

Now select Xcode\Preferences… (or ⌘,) and choose the Accounts icon:

submit an app

Click the + in the lower left and select Add Apple ID…:

submit an app

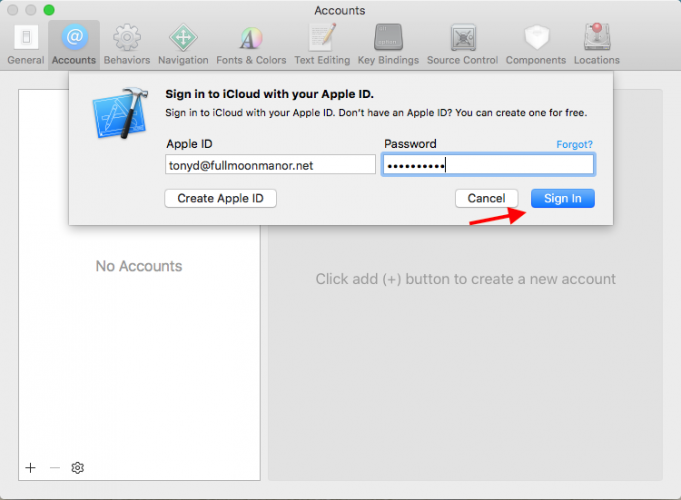
Enter your developer account credentials and click Sign In:
submit an app

Entering your credentials in this way allows Xcode to connect automatically to the Provisioning Portal on your behalf. It will also detect any connected device and automatically register it with the Provisioning Portal if it isn’t there already.

Next you will see a screen that shows your information, note that your role is Agent (this is the super user account and has the most permissions of any role). If your account was set up as a company or business (not an individual developer) you would have the ability to add other folks to your account. Roles can be of type “Member” or “Admin” for these folks.

Click View Details…:

submit an app

At the bottom, you will see a list of the provisioning profiles created so far in the Portal, and a download button next to each one that hasn’t yet been downloaded or installed in Xcode. If you created the two profiles described in part 1, those will be listed here. Click Download All in the lower left corner to install the profiles in Xcode:

submit an app

At this point, your profiles can now be used with any app that has the same Bundle ID you specified in the App ID you included in the profile. Pretty easy, eh? :]

Click Done and close out the preferences pane.

BUT: as mentioned before, there will be times you’ll still need to know how to do this using the Provisioning Portal, so it’s a good thing you’ve seen how to do it the hard way first. Some situations in which you’ll need to know the old-school way:

  • You’re working for a person or company that has their own account, and you need to use their account instead of your own.
  • You’re building a beta version of an app for someone’s device and you don’t have access to the device itself, just the UDID.
  • You need to test app services such as Game Center, In-App Purchase, Data Protection, or iCloud. For these you need a provisioning profile with a bundle ID that does not use a Wildcard App ID. As you might remember from the first part of this tutorial, these work with every app, but do not allow you to test these services, so in this case you need a provisioning profile with a Explicit App ID.
  • You want to be the cool kid that does not use these “generic” profiles and has a profile for every app.

Well, now you’ve seen this easier way, let’s get started with your first real task for this tutorial: preparing your app to run on your device.

Running Your App on Your Device

For this section of the tutorial, you need an app to test on your device. This tutorial uses the Drop Charge app from 2D iOS & tvOS Games by Tutorials. You can download the app from here.

If you already have an app of your own that’s ready to test, feel free to use that instead, or use any of the other great apps from our site.

Open the project you chose (mine, your own, or one from our site) in Xcode. Open the project navigator and click on the project node of the tree (1), then click on the target (2), then click General (3), set Deployment Target (4) to 9.0 at the top:

submit an app

Note that deployment target is a fancy way of saying “the minimum version of iOS that your code supports”. Be careful though, because if, for example, you set this to iOS 8.0 but use an API that is only available on iOS 9 without checking first, your app will crash! The safest thing to do is to test your code on a device running the oldest version of iOS you want to support.

Next, change the Bundle Identifier. This should be the same bundle identifier you used for the App ID you registered in the Provisioning Portal:

submit an app

Now you need to assign the team — select your account from the drop down:

submit an app

Next step is to point Xcode to the correct provisioning profiles. Click on the Build Settings tab and search for the word “signing”. In the search results list under the Code Signing Identity section, click on the drop downs for the Debug and Release entries and choose the correct provisioning profiles from those presented by Xcode.

You should select your developer profile for the Debug build, and your distribution profile for the Release build:

submit an app

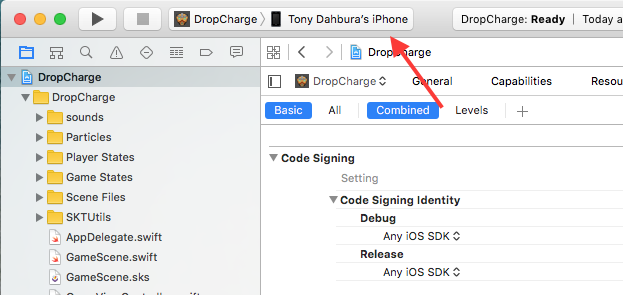
You’re almost ready to build, but before you do, make sure the device you want to build on is connected to your Mac. Then choose to build for that device using the scheme chooser:
submit an app

Press ⌘B to build the project. You may see a prompt saying “codesign wants to sign using key ‘privateKey’ in your keychain”. The Mac is letting you know Xcode wants to access your credentials. Click Always Allow.

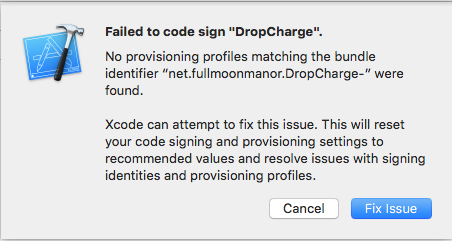
If there are any problems with your profiles, you’ll see something like this popup in Xcode:
submit an app

In this example, the Bundle ID had been accidentally mis-typed. Xcode will gladly go make you a new profile for you — but you do not want that so don’t hit Fix Issue — select Cancel instead and go back and correct the Bundle ID manually.

Hit ⌘B to build again. Now everything should be OK:

submit an app

Hit ⌘R to run the app. In a few moments you should see your app running on your device! Yay! Finally! :]

Next, you need to know how to submit an app to Apple for approval. For this, you’ll have to use iTunes Connect.

Last Stop: iTunes Connect

Now it’s time to get to know iTunes Connect. Go to: https://developer.apple.com/membercenter and log in with your iOS Developer credentials.

Click iTunes Connect:

submit an app

Note: You can also connect directly to iTunes Connect via the url: https://itunesconnect.apple.com

The first time you connect, you’ll see a brief introduction panel. You may wish to skip this in future:

submit an app

Also, if it’s your first time, you’ll have to accept the Terms of Service. By now you know the drill: lawyer, click checkbox, click Accept. It might be a good idea to keep that lawyer on a retainer…:

submit an app

You will now be greeted with the main iTunes Connect dashboard. There are a lot of things to do here — this tutorial will show you the basic steps to get your app submitted, but if you want the gritty details you can check out the complete iTunes Connect Developer Guide.

First things first: If you want to get paid for your apps, there’s some “paperwork” you must fill out. It’s better to get this stuff out of the way right now. It’s pretty boring and it will vary a lot from country to country but, seriously, if you want to get money from your apps you’ll have to endure it.

If all of your apps (or at least the first) will be free, you can skip this section and go right to Submitting Your App below.

Hey, you’re still here? OK then, click Agreements, Tax and Banking:

submit an app

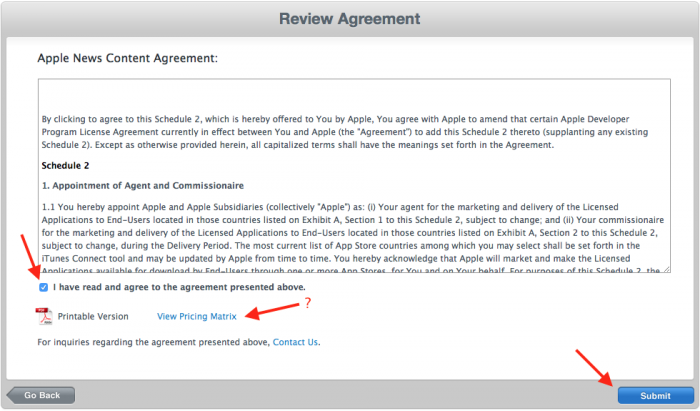
First time in, you’ll have to electronically sign one contract for paid applications that covers all terms of payment.

Click Request:

submit an app

Phone lawyer (told you you should get a retainer), yada, yada, yada. If you want to, you can click View Pricing Matrix. Now click checkbox then, click Submit:
submit an app

Contact Information

It’s time to set up your contact information. Click the first Set Up button, under Contact Info:

submit an app

Click Add New Contact:

submit an app

Add yourself as a new contact. Since no one is looking, give yourself a nice title, like CEO or President. Click Save when done:

submit an app

Assuming, as in part 1, that you are an individual developer and have no employees, you can give yourself all the roles. Change every drop down menu and click Done:

submit an app

Bank Information

Now under Bank Info click Set Up:

submit an app

Again, since this is your first time here, you’ll have to first click Add Bank Account:

submit an app

Choose the appropriate Bank Country. If you choose anything other than United States, be aware that the steps from now on may be different. Click Next:

submit an app

Your bank’s ABA Routing number is located on your checks or statements, as indicated below in the orange box. Enter the correct ABA Routing Number, click Next:

submit an app

Now you have to look for your bank’s branch. Look for one in your city but don’t expect to find an exact match for your branch. Don’t worry, it doesn’t have to be exact. Click Next:

submit an app

Check the information (again, don’t worry if the address is not exact) and click “Next”:

submit an app

Now comes the important piece: your account number. This is also found on your checks or statements, as indicated in the blue box below. Fill out all the details for your account and click Next:

submit an app

Confirm all the information, check the box indicating that it is correct, and click Save:

submit an app

Now you can select this new back account and click Save:

submit an app

Tax Information

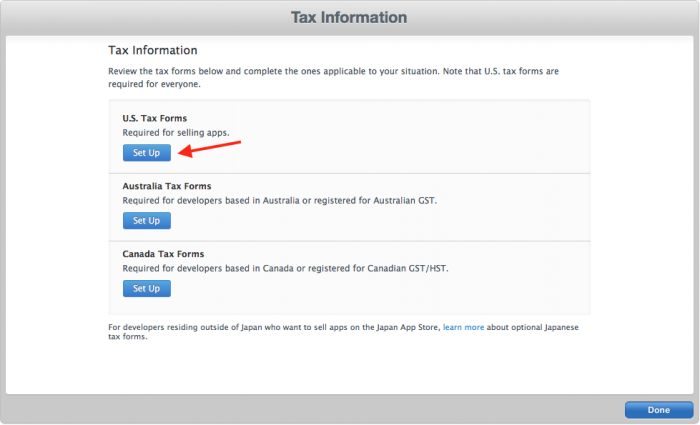
We’re almost done. You’ll at least have to fill out the US tax forms. Under Tax Info click Set Up:

submit an app

You must complete the US form no matter whatever other forms you may also need to complete. Click Set Up under U.S. Tax Forms:
submit an app

Fill out all the required information. Though the process should be straightforward for US citizens, you may have questions. Before coughing up money to speak to an accountant, make sure that your question can’t be answered in the W-9 instructions available for download from the upper-left corner of the page.

submit an app

Scroll down, fill everything out, and refer back to the W-9 instructions if you need to. Make sure everything is correct and click Submit:

submit an app

Notice that the Status field in the Contracts In Process panel now says “Processing” – Apple is verifying the information you provided. This may take an hour or so to be become active — you may even see a deposit in your account followed by a withdrawal of the same amount.

submit an app

Once all your contracts have been verified, the Contracts in Process panel will disappear, and you’re just left with the Contracts In Effect:

submit an app

Click Done to go back to the main iTunes Connect Dashboard.

Phew, thank goodness that’s done! The boring part is over. Better still, if you did all that correctly, you can now get paid!

Submitting Your App

If you really want to submit an app of your own instead of just following along, there are certain items you’ll need to get in order, before you can go any further. Make sure you have the following ready before you even get started:

  • Your app’s name.
  • Your app’s description.
  • Your app’s icon, sized 1024 by 1024 pixels.
  • 3.5 inch retina: Sized: 640 x 920 (no status); 640 x 960 (full screen); or, for landscape, 960 x 600 (no status bar); or 960 x 640 (full screen).
  • 4 inch retina: Sized: 640 x 1096 (no status); 640 x 1136 (full screen); or, for landscape, 1136 x 600 (no status); 1136 x 640 (full screen).
  • 4.7 inch retina: Sized: 750 x 1334 (portrait); 1334 x 750 (landscape).
  • 5.5 inch retina: Sized: 1242 x 2208 (portrait); 2208 x 1242 (landscape).
  • iPad: These should be sized 1024 x 748 (landscape, no status); 1024 x 768 (landscape, full screen); 2048 x 1496 (landscape hi-res, no status); 2048 x 1536 (landscape hi-res, full screen); 768 x 1004 (portrait, no status bar); 768 x 1024 (portrait, full screen); 1536 x 2008 (hi-res portrait, no status bar); 1536 x 2048 (hi-res portrait, full screen).
  • iPad Pro: Sized 2048 x 2732 (portrait); 2732 x 2048 (landscape).

Notes: Your images can be in JPEG or PNG format. At least one screenshot is required for each device your app supports (maximum 5 for each). You should not include the status bar in the images.

Thank goodness for Auto-Layout for apps with all these screen sizes from the mix of devices! For most games you will use the full screen options for your screen shots.

Once you’ve got all this assembled, click My Apps in iTunes Connect:

submit an app

Click +, followed by selecting New App:

submit an app

  • Platforms – Choose iOS for your app.
  • Name – enter the name of your app (as it will appear on the App Store).
  • Primary Language – select from the choices.
  • Bundle ID – select the correct id from the drop down of IDs you registered earlier.
  • SKU – a unique ID for your app in the Apple system that is not seen by users. You can use letters, numbers, hyphens, periods, and underscores. The SKU can’t start with a hyphen, period, or underscore.

Click Create:

submit an app

Now the details screen appears. Click App Information. Fill out the Category fields based on your app information. If your app gathers data or your app is “Made for Kids” you must have a privacy policy posted — the Privacy Policy URL should contain the address for this. Scroll through the rest of the settings and set any appropriate for your app. Click Save:

submit an app

Now click Pricing and Availability:

submit an app

Select All Prices and Currencies for more information about the price tiers. Now choose your desired price tier or indicate that your app will be free. You can specify different prices within different date ranges if you wish by selecting Plan a Price Change. But for now, just add one entry — the Start Date will default to today; the End Date will be set to “No End Date”.

Check the radio button if you want your app to be offered at a discount to educational institutions when they purchase multiple copies at once. You can also offer your app to businesses at a discount for multiple purchases.

Once you’re done, click Save:

submit an app

Click 1.0 Prepare for Submission:

submit an app

This section is where you add all the assets for your app to appear in the App Store. First step is to upload your app’s icon and at least one screenshot. If your app is universal, you’ll need to submit screenshots for the iPhone and for the iPad. When you have what you need, just drag and drop the screenshots over for each device type.

Tips: You can make your screenshots with the Simulator by clicking ⌘S when your app is running. Run the simulator in 100% scale mode and use the following simulators for the proper screenshot sizes:

  • 4.7-inch is 6S simulator
  • 5.5-inch is iPhone 6S+
  • 4-inch is iPhone 5
  • 3.5-inch is iPhone 4S
  • iPad is iPad2
  • iPad Pro is iPad Pro

Click Save when you’ve added all the screenshots you need.

submit an app

Scroll down and complete the the description (this is what the users will see in the app store) and keywords.

Consider the keywords — these are very important. Only your app’s name and keywords are indexed in iTunes’ search engine, so brainstorm words that potential users might think of using to find your app or your competitor’s apps. You can only change keywords when submitting updates, so choose wisely.

Enter the URL for your website support page. It can be a simple page that allows users to email you if they want to compliment you on your great work :]

submit an app

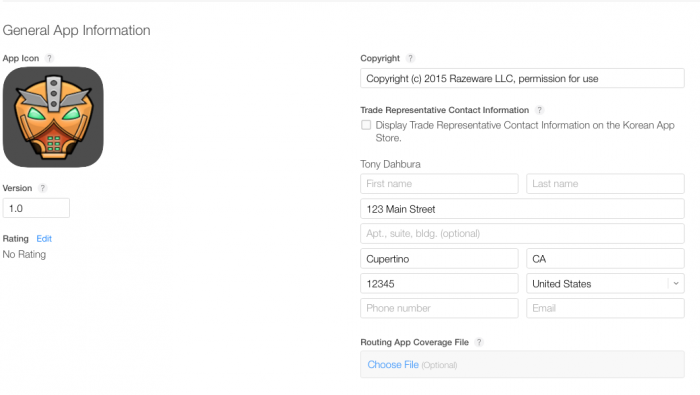
Skip the Build section for now and scroll down to General App Information. Add your icon — it must be 1024 by 1024 pixels.

Set the version number (should be the same as in your app’s Xcode project).

Fill out a copyright notice (generally just the release year and your name or your company’s name), a contact email and affiliated websites.
submit an app

Click Edit next to Rating. Enter the categories appropriate for your app. Be honest, as the reviewer can make changes to this section if they disagree. Click Done:

submit an app

Scroll down to App Review Information. This section is designed to help the person who reviews and approves your app. The Notes can be used for details about your app that you want the reviewer to know about. For example, if users need to sign up at a website or even within the app in order to use it, provide some credentials here to make the reviewer’s job easier. Also, if your app requires special hardware, ensure that you explain that here too, and try to have a way for the reviewer to use the app without the hardware. Complete the contact information so that the reviewer can reach you to discuss things if they need to:

submit an app

Finally, use the Version Release section to indicate when you want the app to be released. Since this is the first version, just leave the Automatically release this version option selected.

Now click Save:

submit an app

If there were no issues with what you have entered, you will now see a Submit for Review button in the top right:

submit an app

If you try to click Submit for Review you will get a message saying that there were one or more errors on the page — your app has not been uploaded yet!

submit an app

submit an app

Remember you skipped the Build section? So now you need to upload your app using Xcode.

Submit an app with Xcode

Your application should now be tested and ready to roll. All you need to do is submit to Apple for approval. This is surprisingly easy considering what you’ve been through already.

Go to Xcode and choose Generic iOS Device in the scheme chooser:

submit an app

Then choose Product\Archive:

submit an app

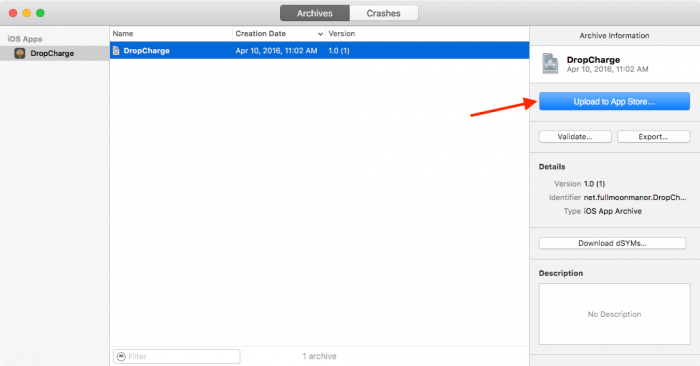
If everything is okay with the build, Xcode will open the Organizer window with your app in the Archives tab. You don’t really need to click “Validate…” here because this will be done when you submit anyway, and Xcode should have already validated against most problems. So save yourself some time and click Upload to App Store…:
submit an app

Select your iOS Developer credentials and click Choose:

submit an app

Next, you will be shown the app to upload. Click Upload:

submit an app

Your app will start uploading to iTunes Connect. Various windows will update with messages as code is compiled, verified and code-signed. When the upload finishes, you should see the following message:

submit an app

Just smile and click Done. :]

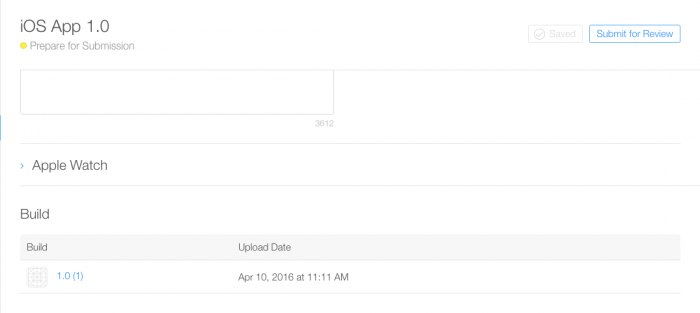
You now just have a couple of quick steps to submit the app. Switch back to iTunes Connect and scroll down to the Build area you skipped earlier and click Select a build before you submit your app:

submit an app

Select the build Xcode just uploaded and click Done:

submit an app

Click Save at the top right:

submit an app

Click Submit for Review:

submit an app

Answer these questions honestly, then click Submit:

submit an app

You’re done now. You should receive a couple of emails from iTunes Connect telling you your app has been uploaded and is waiting for review. Your app’s status has also changed:

submit an app

All you have to do now is wait for your app to be approved! You will receive emails about every change in status your app moves through. Usually after about a week the status should change to “In Review,” then to “Approved”. Unless you chose a future release date, a few minutes after approval your app’s status will shift to “Processing for App Store”, then a few minutes later to “Ready for Sale”.

In iTunes Connect click Activity, followed by App Store Versions to see the status of your app throughout the process:

submit an app

If your app is not approved, Apple will email you with more information. They have gotten pretty good at being specific at what the exact problem is and how you can fix it, for the most part. If this happens, it’s no big deal – just fix the problem and re-submit.

Here are the exact dates and times that DropCharge achieved every step of the approval process (all times are EST):

  • Waiting for Review: Sunday April 10, 2016 at 11:57 AM
  • In Review: Wed, Apr 14, 2016 at 2:18 PM
  • Ready for Sale: Wed, Apr 14, 2016 at 5:34 PM

The time for reviews for your apps will vary based on traffic, but in general it takes around 5-10 days for most people.

Source : Raywenderlich